Spring应用架构(三)AOP原理和实现
”代码重复是最糟糕的代码坏味道,只要有出现重复的代码,必定有什么地方存在严重的问题,要么是实现的问题,要么是设计的问题“
在前面的章节,我们系统性地描述了Spring最重要的基石——IoC容器。但是为了更好地提供企业服务和开发支持,还需要借助另一个重要的技术——AOP框架,下面就来分析一下Spring中AOP框架的原理和实现。
AOP的全称是面向方面编程(Aspect-Oriented Programming),与之对应的就是我们熟悉的面向对象编程——OOP,两者采用截然不同的方式看待应用程序结构。在AOP中,系统被分解成方面(Aspect)或者关注点(concern),而不是对象。
OOP是一种成功的、极具表现力的编程范式,很多领域概念都可以自然地表达为对象,从而将其中通用的代码模块化。衡量OOP成功与否的标准就是它在多大程度上避免了代码的重复。一般情况下,OOP能够很好地避免代码重复。具体继承可以帮助我们在不同类型之间共享相同的行为;多态让我们可以用同样的方式来处理不同类型之间的对象,将注意力集中在他们的共同之处。但当遇上一些特定问题的时候,比如,当我们需要为分散的对象引入公共行为时,OOP就显得很无力了。例如,项目希望价差用户是否有权限执行某一个方法,在OOP中,这个检验的操作,需要散落在每个需要检验的方法里面。但是OOP适合定义从上到下的关系,但不适合定义水平的关系。也就是OOP无法帮助我们将类似“权限检查”这样四散的代码模块化。这些代码,无规律地分布在整个对象模型中,无可避免地会造成代码重复。
这种“横切性(crosscutting)”的问题,是产生AOP的原因。一般情况下,我们会选择AOP作为OOP的补充,毕竟两种方式比较而言,OOP在建模和理解上占有绝对的优势。AOP帮助我们处理一些如果使用OOP会散落在各处的代码,将这些代表横切面(crosscutting)问题的代码模块化,使得我们可以尽量减少重复的代码。例如日志,安全检查等,这是一种从程序切面的视角考虑。OO的层级模型无法提供这种视角。
如果熟悉Servlet的同学,可能会对上面的论述嗤之以鼻,因为类似此类问题,也可以很好地通过
Filter过滤器来实现。但是这种方案整个系统就和Servlet的API还有Web应用和Http请求耦合在一起,这是一种很好的解决方案,但是不是一种通用的解决方案。
一些OO设计模式也在尝试解决AOP希望解决的部分问题
- Decorator(装饰器),装饰器类和目标对象实现相同的接口,并且负责调用目标对象,然后加入任意自定义的代码。有点事,保持了目标接口的强类型性,缺点是需要针对每个目标类单独写一个定制的装饰器
- Observer(观察者),通过发生特定的事件来实现和AOP相同的效果,但是这个模式无法提供环绕增强,也就是前置增强无法实现,并且需要插入一些与业务逻辑无关的代码,例如发送消息
- Chain of Responsibility(责任链),允许一个请求在一跳对象链上传播,知道其中一个对象负责处理请求为止,这个使用拦截链的AOP实现相似,不过使用这个模式的对象也必须了解责任链的很多细节,并且对于每个需要责任链的方法,都必须单独为他设置一条责任链。和Decorator模式一样,可以使我们可以在多个对象之间分散责任,但并不是一个通用方法。
AOP技术概念
真正有价值的观念,很少是新东西,在AOP领域中,真正有新意的成果是提出一套完备的切入点理论
- 关注点(concern)一个关注点可以是一个特定的问题、概念、或者程序中的兴趣区间,是应用程序必须达到的一个目标,比如“安全检查”“事务管理”“性能监控”
- 横切关注点(crosscutting concern)如果一个关注点的实现代码散落在很多类或者方法中,就成为“横切关注点”
- 方面(aspect):是对横切关注点的模块化,将散落各处的代码,归整到一处
- 连接点(join point):程序执行过程中的一点,一般为:方法调用(method invocation)、字段访问(filed access)、异常抛出(throws exception)
- 增强(advice):在特定的连接点,执行的动作。
很多AOP框架都以拦截器
interceptor的形式来表现增强。当连接点被调用的时候,它会先得到一个回调消息,例如:在允许执行特定连接点之前,检查安全凭证;在执行某个方法连接点之前开启事务,在连接点执行完毕后提交或回滚事务;环绕增强,处理完成自身的工作外,还有责任主动调用连接点,促使真实的操作proceed。一般来说可以使用环绕增强来实现其他的增强。
- 切入点(pointcut):一组连接点的总称,用于指定某个增强应该在何时被调用,切入点常用正则表达式或者通配符匹配来描述,这成为静态切入点,另一种是动态切入点,例如某个类的某个方法返回
null的时候,将其纳入到某个切入点 - 引入(introduction):为一个现有的Java类或者接口添加方法或者字段,这种技术可以用于实现Java的多继承
- 混入继承(mixin inheritance):一个混入类封装了一组功能,这组功能可以被混入到现有的类中,而不需要通过继承来实现。混入一般通过引入来实现
- 织入(weaving):将方面整合到完整的执行流程中。当执行流程进行到连接点的时候,增强会首先接管流程控制权,当增强允许执行流程继续前进,执行真正的方法调用或字段访问,称为发生(proceed)
- 增强器(Advisor):是Spring中引入的高级概念,由两个部分组成:一个增强,以及一个用于说明“在何处进行增强”的切入点,增强器完整地模块化了一个方面。
上面主要从概念和模型定义上进行描述,下面是技术层面的一些术语
- 拦截器(interceptor),Spring使用它来实现字段和方法的拦截(interception),随之而来的就是在拦截点(例如方法拦截)处挂接一跳拦截链(interceptor chain),链条上的每个拦截器通常会调用下一个拦截器,拦截是一种AOP的实现策略,不是AOP的核心概念
- AOP代理(AOP proxy):即被增强(advise)的对象引用——也就是说,AOP增强将在其上执行的对象引用。和“拦截”一样,AOP代理的概念并非所有AOP实现都具有的。例如AspectJ的增强是直接针对Java类的字节码进行的。但是对于基于拦截的AOP框架,例如spring,AOP代理的观念是立身之本
- 目标对象(target object):位于拦截器末端的对象实例,这也只在使用拦截器机制的框架中存在。
上面这些概念,比较容易混淆,举一个例子做一下说明
1
2
3
4
5
6
7
8
9
10
11
12
13
14
15
16
17
18
19
20
21
22
23
24
25
26
27

    public class SecurityInterceptor implements MethodInterceptor {
        public Object invoke(MethodInvocation invocation) throws Throwable {
            doSecurityCheck();
            return invocation.proceed();
        }

        protected void doSecurityCheck() throws UnauthorizedException {
            // do security check.
        }
    }
    public class MyBusinessObject implements BusinessObject {

        public void businessMethod1() {
            // doSecurityCheck();
            // do biz method
        }

        public void businessMethod2() {
            // doSecurityCheck();
            // do biz method
        }

        public void noRequiredSecurityCheck() {
            // do biz method
        }
    }
在这里安全检查是一个关注点,securityCheck是一个方面,SecurityInterceptor是一个增强advice,三个业务方法就是和安全检查相关的连接点join point这里只应该对前两个方法biz1 和biz2 进行安全检查,第三个忽略这一步骤,因此我们应该选择一个合适的切入点point cut 使其只匹配前两个方法,然后在这个切入点上进行安全增强。
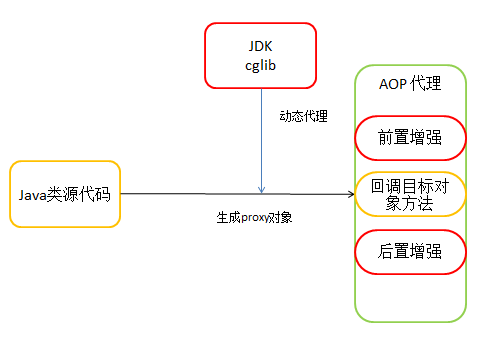
如果我们使用Spring来管理业务对象和拦截器的时候,Spring会在业务对象创建时进行织入weaving,过程为创建一个AOP代理AOP Proxy,这个代理是一个JDK动态代理,首先会调用securityCheck增强,然后调用目标对象MyBusinessObject实例。
Caller -> AOP Proxy -> Advisor(Inteceptor-1) -> Advisor(Inteceptor-2) -> Target Method
实现技术
在了解了AOP的核心概念之后,AOP的实现目标应该是:引入一种适用于任何对象,并且将被增强的代码和特定的API和环境上下文解耦的实现,并且尽量保证强类型性。接下来,让我们看看AOP的一些主要的实现策略
- Java动态代理:最常见的策略是使用JDK的动态代理,更多详细的内容可以参考注解和动态代理
- 动态字节码生成:典型的是使用cglib,作为动态代码生成的框架,因为JDK动态代理只适用于基于接口的代理,如果需要针对类,就需要使用cglib。更多详细的内容可以参考注解和动态代理
- Java代码生成:对目标对象生成新的Java代码,在其中执行横切代码,由于动态代理和动态字节码生成技术的出现,这种方法逐渐退出历史舞台
- 使用定制的类加载器:利用Java类加载机制的可拓展性,通过定制一个类加载器,可以在一个类被加载的时候自动对其进行增强,当用户使用new 构造符构建实例,增强会生效。JBoss采用这种做法对Java类进行增强,增强信息可以在运行时从XML中读取。这种做法的缺点在于,这会导致对类加载体系的依赖
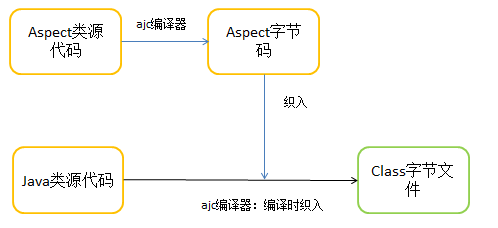
- 语言拓展:AspectJ为代表,对现有的OOP语言进行拓展,引入AOP的概念,AspectJ提供自己的编译器和语法,相当于是引入了一门新的变成语言,学习曲线比较高
Spring的选择
,AOP在J2EE应用中的价值,大多体现在方法拦截上,只要有一个富有表现力的切入点模型即可,纯Java的框架足以满足这一需求。因此Spring提供的AOP框架和Spring的IoC容器结合,并利用AspectJ定义的AOP接口簇。利用JDK动态代理和动态字节码生成技术,实现AOP代理,而不依赖于AspectJ的编译器,从做到功能和独立性的平衡。你也可以在IoC容器之外使用AOP框架,但是将两者结合在一起,增强、增强器、切入点都是Bean,这符合Spring的设计原则——从容器中获取业务对象,从而获得良好的应用接口。在前面提到的BeanPostProcessor机制,也对简化AOP的配置过程非常有帮助。
设计考虑点
根据帕累托原则,Spring AOP 采用渐进式,和实用至上的设计思路,不尝试解决所有的问题,而是尝试实用最简单的方式,满足80%的关键需求。
- 应该拦截字段吗?:
AspectJ可以拦截字段,但是Spring选择不增强字段,主要是处于性能的考虑。Spring不希望用户增强所有的对象,带来性能上的影响。而且增强字段,某种程度上也破坏了对象的封装,如果要增强字段,应该改为通过方法来访问字段,通过增强方法来达到类似的效果。 - 过多的方面:对于团队开发应该制定一定的约束,当一个对象有过多的方面,会增加理解和编程的复杂度
- 正交性:当多个方面作用到同一个对象,AspectJ强调一个正交的连接点模型(orthogonal join point model):不同类型的连接点和不同类型的增强应该可以用任何顺序组合使用。但是,有一些方面,例如事务管理,却很自然地需要对其他方面的顺序提出要求,例如希望他们能够在事务上下文中执行。这个事务上下文由“事务管理”的增强来创建。
- 可测试性和可调试性:AOP本质上是将和业务无关的关注点剥离,这是有利于测试的,调试则取决于是否有良好的沟通和管理机制
- 性能:如果在非常细粒度的情况下使用,AOP频繁创建反射对象,可能会对性能造成很大的影响。如果只是在业务对象的层面使用,这种性能的开销则在可接受的范围内。
Spring AOP的目标是对IoC容器中管理的对象进行合理和易用的拓展,AOP最有价值的用途就是在业务方法的粒度上提供通用的企业服务。比如声明式的事务管理和声明式的安全检查。为此提供了模块化的AOP解决方案和企业级服务,该方案包括了两个部分
- 一个可移植的服务层,类似于JTA、JDBC和别的底层API,这个服务层通常(但是不必须)使用应用服务器提供的J2EE服务,这个服务层就是定义AOP的拦截点、切面、增强的API
- 一个基于AOP的服务获取机制,类似于EJB拦截机制,它基于Java,不基于J2EE,不需要一个无所不包的强大容器
实际上,Spring需要的是一个管理所欲JavaBean的容器,通过对这个容器中对象的增强,来达到具有AOP功能的服务。
具体实现
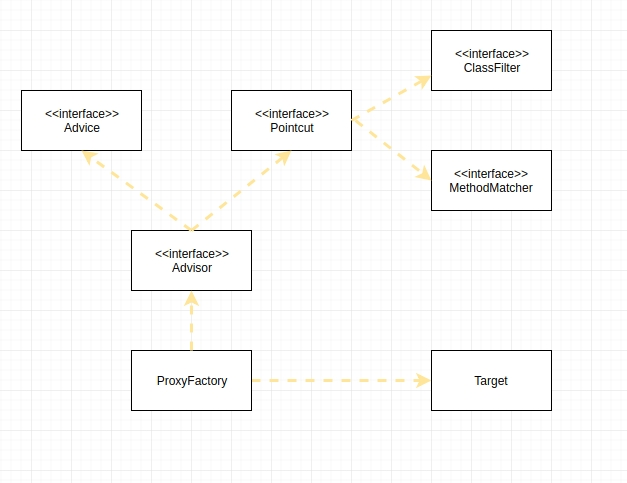
从整体架构上,Spring AOP的核心是代理,首先在ProxyFactory中,加入所需要织入该类的增强,然后创建代理对象,在创建代理对象之前,要指定增强的对象。Advisor在聚合了增强和切入点,在Spring AOP中是方面的一个完整抽象,也就是定义了“在什么地方/情况”需要“增强什么”,接下来看一个使用Spring AOP的例子,基于这个例子,我们来分析具体的源代码和设计实现思路。
1
2
3
4
5
6
7
8
9
10
11
12
13
14
15
16
17
18
19
20
21
22
23
24
25
26
27
28
29
30
31
32
33
34
35
36
37

    public class BizBean {

        public void printTest(String argument){
            System.out.println("测试方法" + argument);
        }
    }

    @Aspect
    public class MyAdvisor {

        /**
         * 配置切入点,使用EL表达式
         */
        private final String POINT-CUT = "execution(* com.example.demo.BizBean.*(..))";

        /**
         * 配置环绕增强
         *
         * @param point ProceedingJoinPoint
         * @return Object
         */
        @Around(POINT-CUT)
        public Object aroundAdvice(ProceedingJoinPoint point){
            System.out.println("around before");
            Object object = null;
            try{
                object = point.proceed();
            }
            catch (Throwable e){
                e.printStackTrace();
            }
            System.out.println("around after");
            return object;
        }
    }
首先定义业务对象BizBean和方面MyAdvisor,逻辑都非常简单,我们定义一个环绕增强,在一前一后打印一段文本。
1
2
3
4
5
6
7
8

    <!-- 激活自动代理功能 -->
    <aop:aspectj-autoproxy />

    <!-- 业务逻辑切面配置 -->
    <bean id="test" class = "com.example.demo.BizBean" />
    <bean class="com.example.demo.MyAdvisor" />
在XML中,使用<aop:aspectj-autoproxy />激活自动AOP代理,并将之前定义的两个Bean,作为普通的Bean对象,交给IoC容器托管。
1
2
3
4
5

    ApplicationContext context = new ClassPathXmlApplicationContext("spring.xml");
    BizBean bean = context.getBean("test", BizBean.class);
    bean.printTest(" 参数");
最终输出为
1
2
3
around before
测试方法 参数
around after
实现原理
从上面的测试代码中可以看到,和之前IoC测试代码中最大的不同就是<aop:aspectj-autoproxy />,这个配置项开启了整个Spring AOP自动化配置。我们在之前有分析过,当Bean的标签命名空间并非默认(”http://www.springframework.org/schema/beans”)的时候,会使用spring.handlers中的中的自定义处理逻辑,进行Bean解析和注册。对应aop标签的为http\://www.springframework.org/schema/aop=org.springframework.aop.config.AopNamespaceHandler
1
2
3
4
5
6
7
8
9
10
11
12
13

    public void init() {
        // 在XML中配置切面等信息
        registerBeanDefinitionParser("config", new ConfigBeanDefinitionParser());
        // 启动对AOP的自动配置支持
        registerBeanDefinitionParser("aspectj-autoproxy", new AspectJAutoProxyBeanDefinitionParser());
        // 使用代理,处理作用域问题
            registerBeanDefinitionDecorator("scoped-proxy", new ScopedProxyBeanDefinitionDecorator());

        // 配合 {@link Configurable} 注解,进行自动装配
            registerBeanDefinitionParser("spring-configured", new SpringConfiguredBeanDefinitionParser());
        }
和Spring AOP相关的标签有这四个
config:使用XML的方式配置AOP的配置属性
1
2
3
4
5
6
7
8
9
    <aop:config >
        <aop:pointcut id="" expression="" />
        <aop:advisor advice-ref=""  pointcut=""/>
        <aop:aspect></aop:aspect>
        <aop:aspect ref="testAspect">
            <aop:after method="xxx" pointcut="" />
            <aop:around method="zzz" pointcut="xxx" />
        </aop:aspect>
    </aop:config>
其<aop:aspect> 标签,可以定义多个pointcut,并在ref的类中,统一定义增强方法;<aop:advisor>则是定义个一个增强和一个pointcut,具体的增强类型,需要根据advice-ref实现的不同Advice子类决定。
aspectj-autoproxy:开启自动装配,主要的作用是结合AspectJ的API和注解,为IoC容器中管理的Bean自动生成代理,也是本文要分析的主要部分
scoped-proxy:使用代理类的方式,来处理长短生命周期冲突的问题。例如一个session作用域的Bean-A,注入给一个单例Bean-S,由于后者只会实例化一次,因此持有的Bean-A引用,就一直是初始注入的那个对象,而前者的生命周期为session,当请求不在session作用域或生命周期方位内,或者,就会出现问题。将一个短生命周期作用域Bean注入给长生命周期作用域bean都会存在此类问题。加入<aop:scoped-proxy/>后,容器将创建一个代理对象ScopedProxyFactoryBean,最终生成一个AOP代理对象,这个代理对象,会每次都从BeanFactory中使用getBean获取对应的Bean-A实例,这样就可以保证语义上的正确性。
spring-configured,配合使用@Configurable注解,引入自动装配功能,现在基本没有使用
aspectj-autoproxy
这是最常见的自动代理生成方式,AspectJAutoProxyBeanDefinitionParser用于解析指定的标签,
1
2
3
4
5
6
7
8
9
10
11
12
13
14
15
16
17
18
19
20
21
22
23
24
25
26
27
28
29
30
31
32
33
34
35
36
37
38
39
40
41
42
43
44
45
46
47
48
49
50
51
52
53
54
55
56
57
58
59
60
61
62
63
64
65

    public BeanDefinition parse(Element element, ParserContext parserContext) {
        /**
         * 注册 AUTO-PROXY-CREATOR-BEAN-NAME :{@link AnnotationAwareAspectJAutoProxyCreator}
         */
        AopNamespaceUtils.registerAspectJAnnotationAutoProxyCreatorIfNecessary(parserContext, element);
        /**
         * 对上一步生成注册的 AUTO-PROXY-CREATOR-BEAN-NAME进一步拓展,主要是定义需要自动扫描生成自动代理的package
         */
        extendBeanDefinition(element, parserContext);
        return null;
    }

    public static void registerAspectJAnnotationAutoProxyCreatorIfNecessary(
            ParserContext parserContext, Element sourceElement) {
        /**
         * 定义 {@link org.springframework.aop.aspectj.annotation.AnnotationAwareAspectJAutoProxyCreator }
         */
        BeanDefinition beanDefinition = AopConfigUtils.registerAspectJAnnotationAutoProxyCreatorIfNecessary(
                parserContext.getRegistry(), parserContext.extractSource(sourceElement));
        /**
         * proxy-target-class 属性:是否启动对类的代理,如果启用,后续会创建基于cglib的动态代理,否则默认使用jdk动态代理
         * expose-class 属性:它的作用是使AopContext.currentProxy()能拿到当前的代理,基于{@link ThreadLocal}可以在对应的类获取代理类
         */
        useClassProxyingIfNecessary(parserContext.getRegistry(), sourceElement);

        /**
         * 之前在 {@link ParserContext} 中有声明 {@link org.springframework.beans.factory.parsing.CompositeComponentDefinition}
         *
         * 则将当前{@link BeanDefinition} 添加到其中
         *
         * 主要用于跟踪BeanDefinition的定义,触发在{@link XmlBeanDefinitionReader} 中的 {@link ReaderEventListener}监听 BeanDefinition 注册事件
         */
        registerComponentIfNecessary(beanDefinition, parserContext);
    }

    private static BeanDefinition registerOrEscalateApcAsRequired(Class<?> cls, BeanDefinitionRegistry registry, Object source) {
        Assert.notNull(registry, "BeanDefinitionRegistry must not be null");
        // 如果已经存在对应的 org.springframework.aop.config.internalAutoProxyCreator BeanDefinition
        if (registry.containsBeanDefinition(AUTO-PROXY-CREATOR-BEAN-NAME)) {
            BeanDefinition apcDefinition = registry.getBeanDefinition(AUTO-PROXY-CREATOR-BEAN-NAME);
            // 并且类型不一样
            if (!cls.getName().equals(apcDefinition.getBeanClassName())) {
                int currentPriority = findPriorityForClass(apcDefinition.getBeanClassName());
                int requiredPriority = findPriorityForClass(cls);
                /**
                 * 根据优先级来确定哪一个需要执行,优先级依次为
                 * AnnotationAwareAspectJAutoProxyCreator > AspectJAwareAdvisorAutoProxyCreator > InfrastructureAdvisorAutoProxyCreator
                 */
                if (currentPriority < requiredPriority) {
                    // 改变代理创建器的实现类
                    apcDefinition.setBeanClassName(cls.getName());
                }
            }
            return null;
        }
        // 如果不存在,注册一个
        RootBeanDefinition beanDefinition = new RootBeanDefinition(cls);
        beanDefinition.setSource(source);
        beanDefinition.getPropertyValues().add("order", Ordered.HIGHEST-PRECEDENCE);
        beanDefinition.setRole(BeanDefinition.ROLE-INFRASTRUCTURE);
        registry.registerBeanDefinition(AUTO-PROXY-CREATOR-BEAN-NAME, beanDefinition);
        return beanDefinition;
    }
以上代码中实现了AnnotationAwareAspectJAutoProxyCreator的BeanDefinition定义和注册,Spring AOP的自动代理功能,主要就依赖这个类来实现。这种自定义BeanDefinition的方式,是Spring提供的一个非常重要的功能。围绕着IoC内核,我们可以自定义解析标签,对于框架的表现力有巨大的提升。
1
2
3
4
5
6
7
8
9
10
11
12
13
14
15
16
17
18
19
20
21
22
23
24
25
26
27
28
29
30
31
32
33
34
35
36
37
38
39
40
41
42
43
44
45
46
47
48
49
50
51
52
53

    private static void useClassProxyingIfNecessary(BeanDefinitionRegistry registry, Element sourceElement) {
        if (sourceElement != null) {
            // proxy-target-class = true
            boolean proxyTargetClass = Boolean.valueOf(sourceElement.getAttribute(PROXY-TARGET-CLASS-ATTRIBUTE));
            if (proxyTargetClass) {
                AopConfigUtils.forceAutoProxyCreatorToUseClassProxying(registry);
            }
            // expose-class = true
            boolean exposeProxy = Boolean.valueOf(sourceElement.getAttribute(EXPOSE-PROXY-ATTRIBUTE));
            if (exposeProxy) {
                AopConfigUtils.forceAutoProxyCreatorToExposeProxy(registry);
            }
        }
    }
    private static void registerComponentIfNecessary(BeanDefinition beanDefinition, ParserContext parserContext) {
        if (beanDefinition != null) {
            BeanComponentDefinition componentDefinition =
                    new BeanComponentDefinition(beanDefinition, AopConfigUtils.AUTO-PROXY-CREATOR-BEAN-NAME);
            parserContext.registerComponent(componentDefinition);
        }
    }

    public static void forceAutoProxyCreatorToUseClassProxying(BeanDefinitionRegistry registry) {
        if (registry.containsBeanDefinition(AUTO-PROXY-CREATOR-BEAN-NAME)) {
            BeanDefinition definition = registry.getBeanDefinition(AUTO-PROXY-CREATOR-BEAN-NAME);
            definition.getPropertyValues().add("proxyTargetClass", Boolean.TRUE);
        }
    }

    static void forceAutoProxyCreatorToExposeProxy(BeanDefinitionRegistry registry) {
        if (registry.containsBeanDefinition(AUTO-PROXY-CREATOR-BEAN-NAME)) {
            BeanDefinition definition = registry.getBeanDefinition(AUTO-PROXY-CREATOR-BEAN-NAME);
            definition.getPropertyValues().add("exposeProxy", Boolean.TRUE);
        }
    }

    /**
     * 将 component 放入 {@link CompositeComponentDefinition} 容器中,用于保存{@link ComponentDefinition}
     * 可以跟踪Bean注册的先后顺序
     *
     * 如果 {@link CompositeComponentDefinition} 容器没有事先初始化,则触发注册事件
     * @param component
     */
    public void registerComponent(ComponentDefinition component) {
        CompositeComponentDefinition containingComponent = getContainingComponent();
        if (containingComponent != null) {
            containingComponent.addNestedComponent(component);
        }
        else {
            this.readerContext.fireComponentRegistered(component);
        }
    }
剩下对属性的修改,主要处理proxy-target-class和expose-class,具体的定义在注释中有简要说明。这边主要还是更改BeanDefinition的定义。最后添加一个用于跟踪BeanDefinition注册顺序的栈,和处理注册事件回调事件的发布口。
AnnotationAwareAspectJAutoProxyCreator
AnnotationAwareAspectJAutoProxyCreator的集成结构图如下,
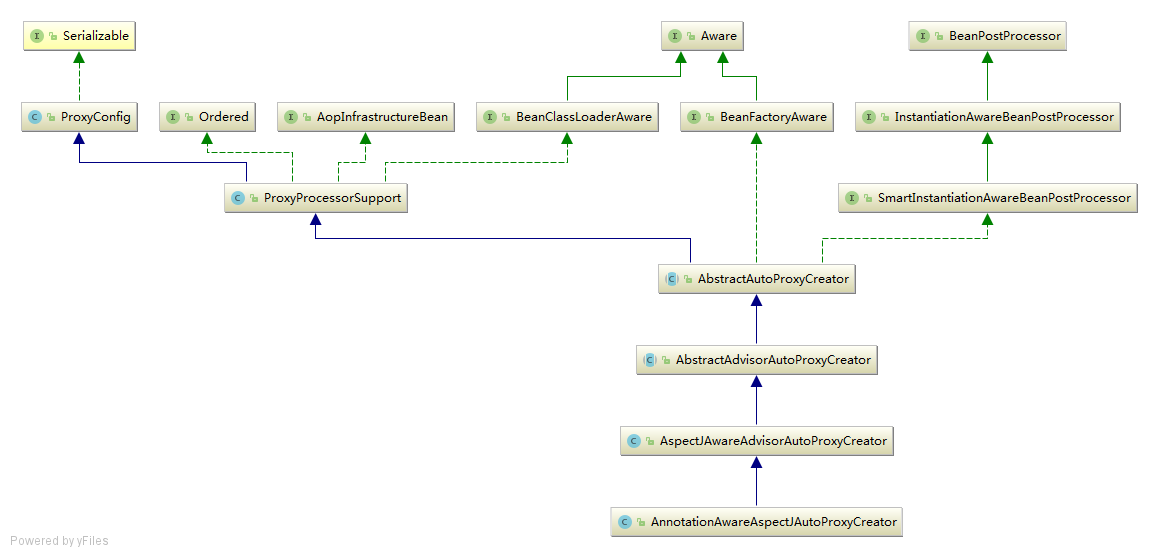
从中可以发现,它本身也是一个BeanPostProcessor,在前面的IoC核心容器分析中,我们知道这是一种在Bean各个生命周期阶段拓展的机制。由此,我们可以猜测,Spring的AOP可能是在Bean初始后的时候,针对实例化后的被代理对象target,生成动态代理target-proxy,取代被代理对象target,作为IoC容器的托管对象。
具体实现bean post机制的位置在AbstractAutoProxyCreator
1
2
3
4
5
6
7
8
9
10
11
12
13
14
15
16
17
18
19
20
21
22
23
24
25
26
27
28
29
30
31
32
33
34
35
36
37
38
39
40
41
42
43
44
45
46
47
48
49
50
51
52
53
54
55
56
57
58
59
60
61
62
63
64
65
66
67
68
69
70
71
72
73
74
75
76
77
78
79

    public Object postProcessBeforeInstantiation(Class<?> beanClass, String beanName) throws BeansException {
        Object cacheKey = getCacheKey(beanClass, beanName);

        if (beanName == null || !this.targetSourcedBeans.contains(beanName)) {
            if (this.advisedBeans.containsKey(cacheKey)) {
                return null;
            }
            if (isInfrastructureClass(beanClass) || shouldSkip(beanClass, beanName)) {
                this.advisedBeans.put(cacheKey, Boolean.FALSE);
                return null;
            }
        }

        if (beanName != null) {
            // 自定义TargetSource,最后会在JoinPoint中影响到getTarget的取值
            TargetSource targetSource = getCustomTargetSource(beanClass, beanName);
            if (targetSource != null) {
                // 如果定义TargetSource,意味着自定义了对应Bean的实例化逻辑,因此直接生成代理
                this.targetSourcedBeans.add(beanName);
                /**
                 * 从上下文中,获取符合当前Bean的增强Advice,在Spring中使用拦截器的方式来定义增强
                 */
                Object[] specificInterceptors = getAdvicesAndAdvisorsForBean(beanClass, beanName, targetSource);
                /**
                 * 生成代理对象
                 */
                Object proxy = createProxy(beanClass, beanName, specificInterceptors, targetSource);
                this.proxyTypes.put(cacheKey, proxy.getClass());
                // 返回代理对象,这里会取代
                return proxy;
            }
        }
        // 返回null,使用IoC的默认实例化逻辑
        return null;
    }

    public Object postProcessAfterInitialization(Object bean, String beanName) throws BeansException {
        if (bean != null) {
            Object cacheKey = getCacheKey(bean.getClass(), beanName);
            if (!this.earlyProxyReferences.contains(cacheKey)) {
                return wrapIfNecessary(bean, beanName, cacheKey);
            }
        }
     // 返回代理对象
        return bean;
    }

    protected Object wrapIfNecessary(Object bean, String beanName, Object cacheKey) {
        if (beanName != null && this.targetSourcedBeans.contains(beanName)) {
            // 如果在{@link #postProcessBeforeInstantiation} 阶段已经处理,直接返回bean即可
            return bean;
        }
        if (Boolean.FALSE.equals(this.advisedBeans.get(cacheKey))) {
            // 不需要进行代理
            return bean;
        }
        // 跳过不生成代理,一个典型的例子Advisor本身,不需要生成代理,否则就会导致循环依赖
        if (isInfrastructureClass(bean.getClass()) || shouldSkip(bean.getClass(), beanName)) {
            //
            this.advisedBeans.put(cacheKey, Boolean.FALSE);
            return bean;
        }

        // 生成代理和 {@link #postProcessBeforeInstantiation} 行为一致
    // 使用{@link SingletonTargetSource} 作为默认的{@link TargetSource} 实现
        Object[] specificInterceptors = getAdvicesAndAdvisorsForBean(bean.getClass(), beanName, null);
        if (specificInterceptors != DO-NOT-PROXY) {
            this.advisedBeans.put(cacheKey, Boolean.TRUE);
            Object proxy = createProxy(
                    bean.getClass(), beanName, specificInterceptors, new SingletonTargetSource(bean));
            this.proxyTypes.put(cacheKey, proxy.getClass());
            return proxy;
        }

        this.advisedBeans.put(cacheKey, Boolean.FALSE);
        return bean;
    }
postProcessBeforeInstantiation会在Bean实例化之前调用,postProcessAfterInitialization在Bean实例化后调用,两者之间的区别主要在于,前者允许在用户针对被代理对象进行自定义实例化生成对应的TargetSource,后者则是使用IoC容器默认的实例化策略,生成被代理对象,使用SingletonTargetSource封装。如果将这两部分逻辑合并,可以简单讲代理生成抽象为:
- 校验,忽略一些不应该生成代理的
Bean,例如Aspect等,这可以避免出现循环依赖 - 生成被代理对象
target,封装为TargetSource,TargetSource的主要作用是在AOP代理过程中获取被代理对象,会在后面的AOP调用中使用 getAdvicesAndAdvisorsForBean,根据Bean,选择符合条件的增强,对应也就是上下文中定义的各种Advice和AdvisorcreateProxy根据上面这些条件,生成代理对象
在这里,我们中点关注的是步骤3和步骤4,先看3
1
2
3
4
5
6
7
8
9
10
11
12
13
14
15

    protected List<Advisor> findEligibleAdvisors(Class<?> beanClass, String beanName) {
      // 获取所有的Advisor
        List<Advisor> candidateAdvisors = findCandidateAdvisors();
        // 在所有的Advisor中,选择出适合当前Bean的Advisor
        List<Advisor> eligibleAdvisors = findAdvisorsThatCanApply(candidateAdvisors, beanClass, beanName);
        // 扩充Advisors,spring会添加一些内部的Advisors
        extendAdvisors(eligibleAdvisors);
        if (!eligibleAdvisors.isEmpty()) {
            // 排序
            eligibleAdvisors = sortAdvisors(eligibleAdvisors);
        }
        return eligibleAdvisors;
    }
获取符合条件Advisor的步骤大致可以分成
findCandidateAdvisors查找上下文中的所有AdvisorfindAdvisorsThatCanApply选择出适合当前Bean的AdvisorextendAdvisors扩充Advisors,Spring会根据需要添加一些内部的AdvisorssortAdvisors对Advisors排序
1
2
3
4
5
6
7
8
9
10
11

    protected List<Advisor> findCandidateAdvisors() {
        // Add all the Spring advisors found according to superclass rules.
        // 获取在上下文中定义的{@link Advisor} 类型的Bean
        List<Advisor> advisors = super.findCandidateAdvisors();
        // Build Advisors for all AspectJ aspects in the bean factory.
        // 获取上下文中,使用了AspectJ 风格的注解
        advisors.addAll(this.aspectJAdvisorsBuilder.buildAspectJAdvisors());
        return advisors;
    }
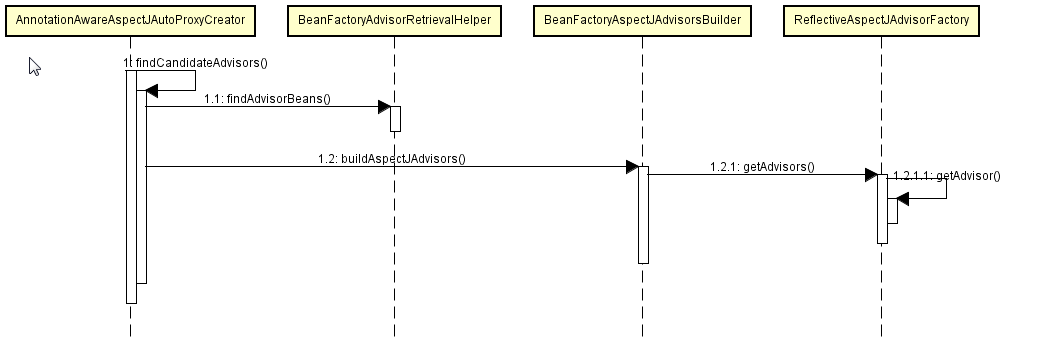
Advisor增强器由两个部分构成,一个是在应用上下文中,定义的Advisor类型的Bean,对应BeanFactoryAdvisorRetrievalHelper#findAdvisorBeans(),一部分是使用了AspectJ风格注解的普通普通Bean,对应BeanFactoryAspectJAdvisorsBuilder#buildAspectJAdvisors()
1
2
3
4
5
6
7
8
9
10
11
12
13
14
15
16
17
18
19
20
21
22
23
24
25
26
27
28
29
30
31
32
33
34
35
36
37
38

    public List<Advisor> findAdvisorBeans() {
        // Determine list of advisor bean names, if not cached already.
        String[] advisorNames = null;
        synchronized (this) {
            advisorNames = this.cachedAdvisorBeanNames;
            if (advisorNames == null) {
                // 根据类型{@link Advisor} 获取所有的BeanNanme
                advisorNames = BeanFactoryUtils.beanNamesForTypeIncludingAncestors(
                        this.beanFactory, Advisor.class, true, false);
                this.cachedAdvisorBeanNames = advisorNames;
            }
        }
        if (advisorNames.length == 0) {
            return new LinkedList<Advisor>();
        }
        List<Advisor> advisors = new LinkedList<Advisor>();
        for (String name : advisorNames) {
            if (isEligibleBean(name)) {
                if (this.beanFactory.isCurrentlyInCreation(name)) {
                    if (logger.isDebugEnabled()) {
                        logger.debug("Skipping currently created advisor '" + name + "'");
                    }
                }
                else {
                    try {
                        // 获取对应的{@link Advisor}实例
                        advisors.add(this.beanFactory.getBean(name, Advisor.class));
                    }
                    catch (BeanCreationException ex) {
                        ......//异常处理
                        throw ex;
                    }
                }
            }
        }
        return advisors;
    }
第一部分相对简单,直接从BeanFactory中获取Advisor类型的Bean即可
1
2
3
4
5
6
7
8
9
10
11
12
13
14
15
16
17
18
19
20
21
22
23
24
25
26
27
28
29
30
31
32
33
34
35
36
37
38
39
40
41
42
43
44
45
46
47
48
49
50
51
52
53
54
55
56
57
58
59
60
61
62
63
64
65
66
67
68
69
70
71
72
73
74
75
76
77
78
79
80
81

    public List<Advisor> buildAspectJAdvisors() {
        List<String> aspectNames = null;

        synchronized (this) {
            aspectNames = this.aspectBeanNames;
            if (aspectNames == null) {
                List<Advisor> advisors = new LinkedList<Advisor>();
                aspectNames = new LinkedList<String>();
                // 获取所有的Bean名
                String[] beanNames =
                        BeanFactoryUtils.beanNamesForTypeIncludingAncestors(this.beanFactory, Object.class, true, false);
                for (String beanName : beanNames) {
                    // package 是否符合自动扫描路径
                    if (!isEligibleBean(beanName)) {
                        continue;
                    }
                    // We must be careful not to instantiate beans eagerly as in this
                    // case they would be cached by the Spring container but would not
                    // have been weaved
                    Class<?> beanType = this.beanFactory.getType(beanName);
                    if (beanType == null) {
                        continue;
                    }
                    // 判断是否有 {@link Aspect} 注解
                    if (this.advisorFactory.isAspect(beanType)) {
                        aspectNames.add(beanName);
                        // 构建Aspect的元数据
                        AspectMetadata amd = new AspectMetadata(beanType, beanName);
                        // 根据AspectJ 语法,可以生成不同类型的切面
                        if (amd.getAjType().getPerClause().getKind() == PerClauseKind.SINGLETON) {
                            // singleton:  单例模式, 即切面只会有一个实例
                            MetadataAwareAspectInstanceFactory factory =
                                    new BeanFactoryAspectInstanceFactory(this.beanFactory, beanName);
                            // 创建 Advisors
                            List<Advisor> classAdvisors = this.advisorFactory.getAdvisors(factory);
                            if (this.beanFactory.isSingleton(beanName)) {
                                // advisorsCache缓存Advisor
                                this.advisorsCache.put(beanName, classAdvisors);
                            }
                            else {
                                this.aspectFactoryCache.put(beanName, factory);
                            }
                            advisors.addAll(classAdvisors);
                        }
                        else {
                            // perthis: 原型模型, 每个切入点表达式匹配的连接点对应的AOP对象都会创建一个新切面实例
                            // pertarget: 原型模型, 每个切入点表达式匹配的连接点对应的目标对象都会创建一个新的切面实例
                            // Per target or per this.
                            if (this.beanFactory.isSingleton(beanName)) {
                                throw new IllegalArgumentException("Bean with name '" + beanName +
                                        "' is a singleton, but aspect instantiation model is not singleton");
                            }
                            MetadataAwareAspectInstanceFactory factory =
                                    new PrototypeAspectInstanceFactory(this.beanFactory, beanName);
                            this.aspectFactoryCache.put(beanName, factory);
                            advisors.addAll(this.advisorFactory.getAdvisors(factory));
                        }
                    }
                }
                this.aspectBeanNames = aspectNames;
                return advisors;
            }
        }

        if (aspectNames.isEmpty()) {
            return Collections.emptyList();
        }
        List<Advisor> advisors = new LinkedList<Advisor>();
        for (String aspectName : aspectNames) {
            List<Advisor> cachedAdvisors = this.advisorsCache.get(aspectName);
            if (cachedAdvisors != null) {
                advisors.addAll(cachedAdvisors);
            }
            else {
                MetadataAwareAspectInstanceFactory factory = this.aspectFactoryCache.get(aspectName);
                advisors.addAll(this.advisorFactory.getAdvisors(factory));
            }
        }
        return advisors;
    }
针对AspectJ的语法,设定生成的代理是单例还是原型模式,一般情况下,我们都采用单例模式,也就是一个切面可以在多个Bean之间共用。反之,则会为每个被代理对象(perthis/pertarget),关于这块内容更多的讨论可以参考《AspectJ 编程指南》。
this.advisorFactory.getAdvisors(factory)会调用ReflectiveAspectJAdvisorFactory的对应方法
1
2
3
4
5
6
7
8
9
10
11
12
13
14
15
16
17
18
19
20
21
22
23
24
25
26
27
28
29
30
31
32
33
34
35
36
37
38
39
40
41
42
43
44
45
46
47
48
49
50
51
52
53
54
55
56
57
58
59
60
61
62

    public List<Advisor> getAdvisors(MetadataAwareAspectInstanceFactory aspectInstanceFactory) {
       ......//校验
        List<Advisor> advisors = new LinkedList<Advisor>();
        for (Method method : getAdvisorMethods(aspectClass)) {
            // 创建Advisor
            Advisor advisor = getAdvisor(method, lazySingletonAspectInstanceFactory, advisors.size(), aspectName);
            if (advisor != null) {
                advisors.add(advisor);
            }
        }

        // If it's a per target aspect, emit the dummy instantiating aspect.
        if (!advisors.isEmpty() && lazySingletonAspectInstanceFactory.getAspectMetadata().isLazilyInstantiated()) {
            Advisor instantiationAdvisor = new SyntheticInstantiationAdvisor(lazySingletonAspectInstanceFactory);
            advisors.add(0, instantiationAdvisor);
        }

        // 处理引入 {@link DeclareParents}
        for (Field field : aspectClass.getDeclaredFields()) {
            Advisor advisor = getDeclareParentsAdvisor(field);
            if (advisor != null) {
                advisors.add(advisor);
            }
        }

        return advisors;
    }

    public Advisor getAdvisor(Method candidateAdviceMethod, MetadataAwareAspectInstanceFactory aspectInstanceFactory,
            int declarationOrderInAspect, String aspectName) {

        validate(aspectInstanceFactory.getAspectMetadata().getAspectClass());

        // 获取切入点
        AspectJExpressionPointcut expressionPointcut = getPointcut(
                candidateAdviceMethod, aspectInstanceFactory.getAspectMetadata().getAspectClass());
        if (expressionPointcut == null) {
            return null;
        }

        return new InstantiationModelAwarePointcutAdvisorImpl(expressionPointcut, candidateAdviceMethod,
                this, aspectInstanceFactory, declarationOrderInAspect, aspectName);
    }

    private AspectJExpressionPointcut getPointcut(Method candidateAdviceMethod, Class<?> candidateAspectClass) {
        /**
         * 获取带有AspectJ 风格的注解 例如 {@link After} {@link After}
          */
        AspectJAnnotation<?> aspectJAnnotation =
                AbstractAspectJAdvisorFactory.findAspectJAnnotationOnMethod(candidateAdviceMethod);
        if (aspectJAnnotation == null) {
            return null;
        }

        // 获取对应的表达式
        AspectJExpressionPointcut ajexp =
                new AspectJExpressionPointcut(candidateAspectClass, new String[0], new Class<?>[0]);
        // 构建实例返回
        ajexp.setExpression(aspectJAnnotation.getPointcutExpression());
        return ajexp;
    }
这块的代码比较复杂,整体的逻辑是利用放射方法,从Aspect中,获取完整的切面信息,最后会为每一个增强方法生成InstantiationModelAwarePointcutAdvisorImpl,也是最终buildAspectJAdvisors的返回值。这个类,包含declaredPointcut和aspectJAdviceMethod,最重要的方法是
1
2
3
4
5
6
7
8
9
10
11
12
13
14

    // 获取增强方法
    public synchronized Advice getAdvice() {
        if (this.instantiatedAdvice == null) {
            this.instantiatedAdvice = instantiateAdvice(this.declaredPointcut);
        }
        return this.instantiatedAdvice;
    }

    private Advice instantiateAdvice(AspectJExpressionPointcut pcut) {
    //根据切入点,实例化增强
        return this.aspectJAdvisorFactory.getAdvice(this.aspectJAdviceMethod, pcut,
                this.aspectInstanceFactory, this.declarationOrder, this.aspectName);
    }
到这里,我们将所有的候选Advisor,下一步将从候选中,选择符合当前Bean的Advisor
1
2
3
4
5
6
7
8
9
10
11
12
13
14
15
16
17
18
19
20
21
22
23
24
25
26
27
28
29
30
31
32
33
34
35
36
37
38
39
40
41
42

    public static List<Advisor> findAdvisorsThatCanApply(List<Advisor> candidateAdvisors, Class<?> clazz) {
        if (candidateAdvisors.isEmpty()) {
            return candidateAdvisors;
        }
        List<Advisor> eligibleAdvisors = new LinkedList<Advisor>();
        for (Advisor candidate : candidateAdvisors) {
            // 先处理引入增强
            if (candidate instanceof IntroductionAdvisor && canApply(candidate, clazz)) {
                eligibleAdvisors.add(candidate);
            }
        }
        boolean hasIntroductions = !eligibleAdvisors.isEmpty();
        for (Advisor candidate : candidateAdvisors) {
            if (candidate instanceof IntroductionAdvisor) {
                // already processed
                continue;
            }
            // 处理其他增强
            if (canApply(candidate, clazz, hasIntroductions)) {
                eligibleAdvisors.add(candidate);
            }
        }
        return eligibleAdvisors;
    }

    public static boolean canApply(Advisor advisor, Class<?> targetClass, boolean hasIntroductions) {
        if (advisor instanceof IntroductionAdvisor) {
            // {@link ClassFilter} 匹配
            return ((IntroductionAdvisor) advisor).getClassFilter().matches(targetClass);
        }
        else if (advisor instanceof PointcutAdvisor) {
            PointcutAdvisor pca = (PointcutAdvisor) advisor;
            // {@link MethodMatcher} 匹配
            return canApply(pca.getPointcut(), targetClass, hasIntroductions);
        }
        else {
            // It doesn't have a pointcut so we assume it applies.
            return true;
        }
    }
这块的代码主要使用Advisor中定义的Pointcut进行类型和方法匹配。下一个调用时extendAdvisors(eligibleAdvisors)
1
2
3
4
5
6
7
8
9
10
11
12
13
14
15
16
17
18
19
20
21
22
23
24

    protected void extendAdvisors(List<Advisor> candidateAdvisors) {
        AspectJProxyUtils.makeAdvisorChainAspectJCapableIfNecessary(candidateAdvisors);
    }

    public static boolean makeAdvisorChainAspectJCapableIfNecessary(List<Advisor> advisors) {
        // Don't add advisors to an empty list; may indicate that proxying is just not required
        if (!advisors.isEmpty()) {
            boolean foundAspectJAdvice = false;
            for (Advisor advisor : advisors) {
      // 判断是否AspectJ风格的增强
                if (isAspectJAdvice(advisor)) {
                    foundAspectJAdvice = true;
                }
            }
            if (foundAspectJAdvice && !advisors.contains(ExposeInvocationInterceptor.ADVISOR)) {
                // 添加 ExposeInvocationInterceptor
                advisors.add(0, ExposeInvocationInterceptor.ADVISOR);
                return true;
            }
        }
        return false;
    }
主要逻辑是在Advisors最开始之前,添加ExposeInvocationInterceptor,我们知道Spring 的AOP增强是采用拦截器+调用链的模式,这意味着,ExposeInvocationInterceptor将会被最先执行。它最主要的功能是,使用ThreadLocal 将当前的方法调用MethodInvocation 保存在线程变量中 ,可以通过通过ExposeInvocationInterceptor#currentInvocation() 来获取。这样可以在Advisors调用链内共享MethodInvocation,举一个例子,如果BizObject#bizMethod()匹配多个Aspect和多个Advice,那么可以在这些Advice中共享同一个MethodInvocation。
排序相对比较简单,这边就不展开讨论,下一步,进入代理生成
1
2
3
4
5
6
7
8
9
10
11
12
13
14
15
16
17
18
19
20
21
22
23
24
25
26
27
28
29
30
31
32
33
34
35
36
37
38
39
40
41
42
43
44
45
46

    protected Object createProxy(
            Class<?> beanClass, String beanName, Object[] specificInterceptors, TargetSource targetSource) {

        if (this.beanFactory instanceof ConfigurableListableBeanFactory) {
          // 将原始的Bean类型,作为代理BeanDefinition的一个属性 :originalTargetClass
            AutoProxyUtils.exposeTargetClass((ConfigurableListableBeanFactory) this.beanFactory, beanName, beanClass);
        }

        /**
         * 创建代理工厂
         */
        ProxyFactory proxyFactory = new ProxyFactory();
        // ProxyConfig 配置属性设置
        proxyFactory.copyFrom(this);

        if (!proxyFactory.isProxyTargetClass()) {
            if (shouldProxyTargetClass(beanClass, beanName)) {
                proxyFactory.setProxyTargetClass(true);
            }
            else {
                evaluateProxyInterfaces(beanClass, proxyFactory);
            }
        }

        // 构建Advisor
        Advisor[] advisors = buildAdvisors(beanName, specificInterceptors);
        for (Advisor advisor : advisors) {
            // 为代理工厂设置Advisor
            proxyFactory.addAdvisor(advisor);
        }

        // 设置被代理对象
        proxyFactory.setTargetSource(targetSource);
        // template方法,实现类可以进行定制
        customizeProxyFactory(proxyFactory);

        proxyFactory.setFrozen(this.freezeProxy);
        if (advisorsPreFiltered()) {
            proxyFactory.setPreFiltered(true);
        }

        // 创建代理
        return proxyFactory.getProxy(getProxyClassLoader());
    }
Spring AOP中,代理类的创建委托给ProxyFactory来实现,主要分成下面几个步骤
- 创建
ProxyFactory,将当前类的配置属性复制给ProxyFactory实例 - 如果没有设置
proxy-target-class,则设置代理接口 - 构建
Advisors,加入到ProxyFactory中 - 设置被代理对象
- 提供模板方法,可以在具体的实现类中进行自定义
- 创建代理
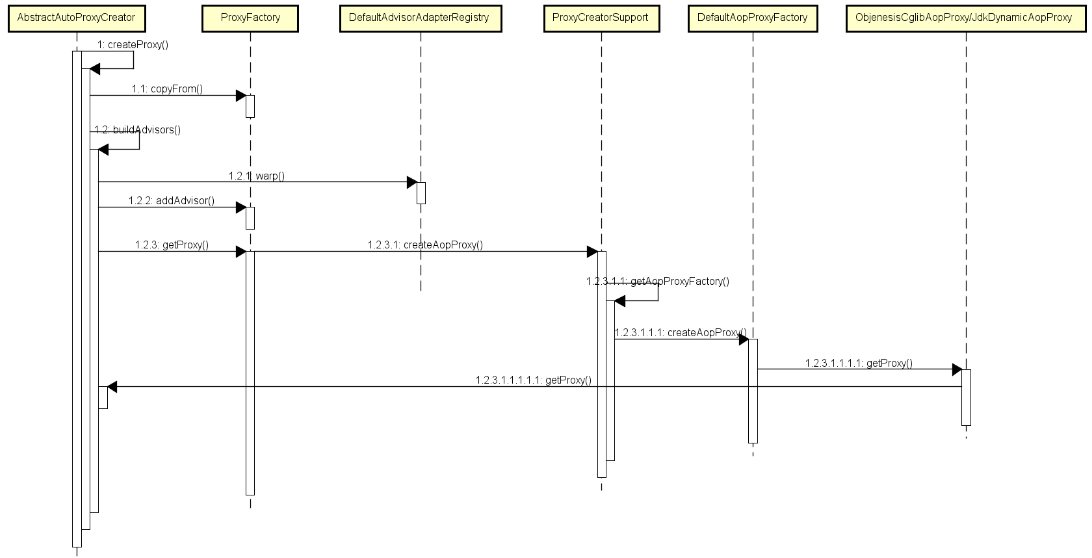
整体调用时序如上,接下来看如何构建Advisors
1
2
3
4
5
6
7
8
9
10
11
12
13
14
15
16
17
18
19
20
21
22
23
24
25
26
27
28
29
30
31
32
33
34
35
36
37
38
39
40
41
42
43
44
45
46
47
48
49
50
51
52
53
54
55
56
57
58
59
60

    protected Advisor[] buildAdvisors(String beanName, Object[] specificInterceptors) {
        // Handle prototypes correctly...
        // 如果this.beanFactry不是 {@link ConfigurableBeanFactory}
        // 则从BeanFactory重新取出Interceptor,在Spring AOP中为各种{@link Advice}
        // 并解析包装成{@link Advisor}
        Advisor[] commonInterceptors = resolveInterceptorNames();

        // 构建所有的拦截器 {@link Advice} 或者 {@link Advisor}
        List<Object> allInterceptors = new ArrayList<Object>();
        if (specificInterceptors != null) {
            allInterceptors.addAll(Arrays.asList(specificInterceptors));
            if (commonInterceptors.length > 0) {
                if (this.applyCommonInterceptorsFirst) {
                    allInterceptors.addAll(0, Arrays.asList(commonInterceptors));
                }
                else {
                    allInterceptors.addAll(Arrays.asList(commonInterceptors));
                }
            }
        }
        if (logger.isDebugEnabled()) {
            int nrOfCommonInterceptors = commonInterceptors.length;
            int nrOfSpecificInterceptors = (specificInterceptors != null ? specificInterceptors.length : 0);
            logger.debug("Creating implicit proxy for bean '" + beanName + "' with " + nrOfCommonInterceptors +
                    " common interceptors and " + nrOfSpecificInterceptors + " specific interceptors");
        }

        Advisor[] advisors = new Advisor[allInterceptors.size()];
        for (int i = 0; i < allInterceptors.size(); i++) {
            // 将Advice/Advisor 转换成为 Advisor
            advisors[i] = this.advisorAdapterRegistry.wrap(allInterceptors.get(i));
        }
        return advisors;
    }

    public Advisor wrap(Object adviceObject) throws UnknownAdviceTypeException {
        /**
         * 根据不同的类型,转换成为{@link Advior} 一般为{@link DefaultPointcutAdvisor}
         */
        if (adviceObject instanceof Advisor) {
            return (Advisor) adviceObject;
        }
        if (!(adviceObject instanceof Advice)) {
            throw new UnknownAdviceTypeException(adviceObject);
        }
        Advice advice = (Advice) adviceObject;
        if (advice instanceof MethodInterceptor) {
            // So well-known it doesn't even need an adapter.
            return new DefaultPointcutAdvisor(advice);
        }
        for (AdvisorAdapter adapter : this.adapters) {
            // Check that it is supported.
            if (adapter.supportsAdvice(advice)) {
                return new DefaultPointcutAdvisor(advice);
            }
        }
        throw new UnknownAdviceTypeException(advice);
    }
这一步是将在Spring AOP中的各种类型的增强,统一转换为内部识别的Advisor,最常见的是DefaultPointcutAdvisor,包含了一个切入点Joinpoint和一个增强Advice。获取Advisor之后,就进入最后一步,
1
2
3
4
5
6
7
8

    protected final synchronized AopProxy createAopProxy() {
        if (!this.active) {
            activate();
        }
        return getAopProxyFactory().createAopProxy(this);
    }
根据AopProxyFactory,其默认实现为DefaultAopProxyFactory来生成AOP代理对象,前面我们已经由提到,主要与两个实现基于JDK的JdkDynamicAopProxy和基于CGlib的ObjenesisCglibAopProxy
1
2
3
4
5
6
7
8
9
10
11
12
13
14
15
16
17
18
19

    public AopProxy createAopProxy(AdvisedSupport config) throws AopConfigException {
        // 选择基于JDK或Cglib的实现
        if (config.isOptimize() || config.isProxyTargetClass() || hasNoUserSuppliedProxyInterfaces(config)) {
            Class<?> targetClass = config.getTargetClass();
            if (targetClass == null) {
                throw new AopConfigException("TargetSource cannot determine target class: " +
                        "Either an interface or a target is required for proxy creation.");
            }
            if (targetClass.isInterface() || Proxy.isProxyClass(targetClass)) {
                return new JdkDynamicAopProxy(config);
            }
            return new ObjenesisCglibAopProxy(config);
        }
        else {
            return new JdkDynamicAopProxy(config);
        }
    }
选择的依据主要是是否设置了proxy-target-class属性,JdkDynamicAopProxy无法为没有实现接口的目标对象生成代理;optimize属性,这个属性会采用的优化策略,只能在ObjenesisCglibAopProxy中生效;hasNoUserSuppliedProxyInterfaces判断是否有实现接口,如果前两个返回未false,并且代理对象有有没有实现接口,或者实现的接口为SpringProxy,则进行下一步的判断。
两者之间的主要区别在于,JdkDynamicAopProxy只能对实现了接口的类生成代理,而不能针对类。CGLIB是针对类实现代理的,但主要是对指定的类生成一个子类,覆盖其中的方法,是继承实现,所以该类或方法不能声明成final。
最后,生成代理对象
1
2
3
    public Object getProxy(ClassLoader classLoader) {
        return createAopProxy().getProxy(classLoader);
    }
对于JdkDynamicAopProxy而言
1
2
3
4
5
6
7
8
9
10
11
12
13

    public Object getProxy(ClassLoader classLoader) {
        if (logger.isDebugEnabled()) {
            logger.debug("Creating JDK dynamic proxy: target source is " + this.advised.getTargetSource());
        }
        // 计算代理类需要代理的接口数量
        Class<?>[] proxiedInterfaces = AopProxyUtils.completeProxiedInterfaces(this.advised);
        // 接口中是否定义了Equals和HashCode方法
        findDefinedEqualsAndHashCodeMethods(proxiedInterfaces);
        // 创建代理对象
        return Proxy.newProxyInstance(classLoader, proxiedInterfaces, this);
    }
可以看到InvocationHandler为this,也就是执行代理对象方法的时候,会调用JdkDynamicAopProxy的invoke方法
1
2
3
4
5
6
7
8
9
10
11
12
13
14
15
16
17
18
19
20
21
22
23
24
25
26
27
28
29
30
31
32
33
34
35
36
37
38
39
40
41
42
43
44
45
46
47
48
49
50
51
52
53
54
55
56
57
58
59
60
61
62
63
64
65
66
67
68
69
70
71
72
73
74
75
76
77
78
79
80
81
82
83
84
85
86
87
88
89
90
91
92

    public Object invoke(Object proxy, Method method, Object[] args) throws Throwable {
        MethodInvocation invocation;
        Object oldProxy = null;
        boolean setProxyContext = false;

        TargetSource targetSource = this.advised.targetSource;
        Class<?> targetClass = null;
        Object target = null;

        try {
            if (!this.equalsDefined && AopUtils.isEqualsMethod(method)) {
                // The target does not implement the equals(Object) method itself.
                return equals(args[0]);
            }
            if (!this.hashCodeDefined && AopUtils.isHashCodeMethod(method)) {
                // The target does not implement the hashCode() method itself.
                return hashCode();
            }
            if (!this.advised.opaque && method.getDeclaringClass().isInterface() &&
                    method.getDeclaringClass().isAssignableFrom(Advised.class)) {
                // Service invocations on ProxyConfig with the proxy config...
                return AopUtils.invokeJoinpointUsingReflection(this.advised, method, args);
            }

            Object retVal;

            // 设置了expose-proxy 属性,则将代理绑定到{@link ThreadLocal}变量中
            if (this.advised.exposeProxy) {
                // Make invocation available if necessary.
                oldProxy = AopContext.setCurrentProxy(proxy);
                setProxyContext = true;
            }

            // May be null. Get as late as possible to minimize the time we "own" the target,
            // in case it comes from a pool.
            target = targetSource.getTarget();
            if (target != null) {
                targetClass = target.getClass();
            }

            // Get the interception chain for this method.
            // 获取拦截链
            List<Object> chain = this.advised.getInterceptorsAndDynamicInterceptionAdvice(method, targetClass);

            // Check whether we have any advice. If we don't, we can fallback on direct
            // reflective invocation of the target, and avoid creating a MethodInvocation.
            // 没有增强方法
            if (chain.isEmpty()) {
                // We can skip creating a MethodInvocation: just invoke the target directly
                // Note that the final invoker must be an InvokerInterceptor so we know it does
                // nothing but a reflective operation on the target, and no hot swapping or fancy proxying.
                // 抽取参数
                Object[] argsToUse = AopProxyUtils.adaptArgumentsIfNecessary(method, args);
                // 直接调用增强目标的方法,返回结果
                retVal = AopUtils.invokeJoinpointUsingReflection(target, method, argsToUse);
            }
            else {
                // We need to create a method invocation...
         // 封装执行方法和调用链到 {@link ReflectiveMethodInvocation}
                invocation = new ReflectiveMethodInvocation(proxy, target, method, args, targetClass, chain);
                // Proceed to the joinpoint through the interceptor chain.
                retVal = invocation.proceed();
            }

            // Massage return value if necessary.
            Class<?> returnType = method.getReturnType();
            if (retVal != null && retVal == target && returnType.isInstance(proxy) &&
                    !RawTargetAccess.class.isAssignableFrom(method.getDeclaringClass())) {
                // Special case: it returned "this" and the return type of the method
                // is type-compatible. Note that we can't help if the target sets
                // a reference to itself in another returned object.
                retVal = proxy;
            }
            else if (retVal == null && returnType != Void.TYPE && returnType.isPrimitive()) {
                throw new AopInvocationException(
                        "Null return value from advice does not match primitive return type for: " + method);
            }
            return retVal;
        }
        finally {
            if (target != null && !targetSource.isStatic()) {
                // Must have come from TargetSource.
                targetSource.releaseTarget(target);
            }
            if (setProxyContext) {
                // Restore old proxy.
                AopContext.setCurrentProxy(oldProxy);
            }
        }
    }
将方法执行的所需要的上下文,和调用链封装在ReflectiveMethodInvocation中,并调用proceed执行
1
2
3
4
5
6
7
8
9
10
11
12
13
14
15
16
17
18
19
20
21
22
23
24
25
26
27
28

    public Object proceed() throws Throwable {
        //    We start with an index of -1 and increment early.
        if (this.currentInterceptorIndex == this.interceptorsAndDynamicMethodMatchers.size() - 1) {
            // 拦截链调用完毕,执行目标方法
            return invokeJoinpoint();
        }

        Object interceptorOrInterceptionAdvice =
                this.interceptorsAndDynamicMethodMatchers.get(++this.currentInterceptorIndex);
        if (interceptorOrInterceptionAdvice instanceof InterceptorAndDynamicMethodMatcher) {
            InterceptorAndDynamicMethodMatcher dm =
                    (InterceptorAndDynamicMethodMatcher) interceptorOrInterceptionAdvice;
            if (dm.methodMatcher.matches(this.method, this.targetClass, this.arguments)) {
                // 动态匹配
                return dm.interceptor.invoke(this);
            }
            else {
                // 动态匹配失败,跳过,进入下一个拦截器
                return proceed();
            }
        }
        else {
          // 直接执行拦截器,将this作为参数传递,是一个递归调用的过程
            return ((MethodInterceptor) interceptorOrInterceptionAdvice).invoke(this);
        }
    }
可以看到整体的调用逻辑,就是拦截器链的调用。
1
2
3
4
5
6
7
8
9
10
11
12
13
14
15
16
17
18
19
20
21
22
23
24
25
26
27
28
29
30
31
32
33
34
35
36
37
38
39
40
41
42
43
44
45
46
47
48
49
50
51
52
53
54
55
56
57
58
59
60
61
62
63
64
65
66
67
68
69
70
71

    public Object getProxy(ClassLoader classLoader) {
        if (logger.isDebugEnabled()) {
            logger.debug("Creating CGLIB proxy: target source is " + this.advised.getTargetSource());
        }

        try {
            Class<?> rootClass = this.advised.getTargetClass();
            Assert.state(rootClass != null, "Target class must be available for creating a CGLIB proxy");

            Class<?> proxySuperClass = rootClass;
            // 处理同为Cglib生成的代理类
            if (ClassUtils.isCglibProxyClass(rootClass)) {
                proxySuperClass = rootClass.getSuperclass();
                Class<?>[] additionalInterfaces = rootClass.getInterfaces();
                for (Class<?> additionalInterface : additionalInterfaces) {
                    this.advised.addInterface(additionalInterface);
                }
            }

            // Validate the class, writing log messages as necessary.
            validateClassIfNecessary(proxySuperClass, classLoader);

            // Configure CGLIB Enhancer...
            // Enhancer 是Cglib生成动态代理的基础和核心类
            Enhancer enhancer = createEnhancer();
            if (classLoader != null) {
                enhancer.setClassLoader(classLoader);
                if (classLoader instanceof SmartClassLoader &&
                        ((SmartClassLoader) classLoader).isClassReloadable(proxySuperClass)) {
                    enhancer.setUseCache(false);
                }
            }
            // 设置继承和结构等超类
            enhancer.setSuperclass(proxySuperClass);
            enhancer.setInterfaces(AopProxyUtils.completeProxiedInterfaces(this.advised));
            enhancer.setNamingPolicy(SpringNamingPolicy.INSTANCE);
            enhancer.setStrategy(new ClassLoaderAwareUndeclaredThrowableStrategy(classLoader));

            // 拦截回调接口,起到和InvokerHandler类似的效果
            Callback[] callbacks = getCallbacks(rootClass);
            Class<?>[] types = new Class<?>[callbacks.length];
            for (int x = 0; x < types.length; x++) {
                types[x] = callbacks[x].getClass();
            }
            // fixedInterceptorMap only populated at this point, after getCallbacks call above
            enhancer.setCallbackFilter(new ProxyCallbackFilter(
                    this.advised.getConfigurationOnlyCopy(), this.fixedInterceptorMap, this.fixedInterceptorOffset));
            enhancer.setCallbackTypes(types);

            // Generate the proxy class and create a proxy instance.
            return createProxyClassAndInstance(enhancer, callbacks);
        }
        catch (CodeGenerationException ex) {
            throw new AopConfigException("Could not generate CGLIB subclass of class [" +
                    this.advised.getTargetClass() + "]: " +
                    "Common causes of this problem include using a final class or a non-visible class",
                    ex);
        }
        catch (IllegalArgumentException ex) {
            throw new AopConfigException("Could not generate CGLIB subclass of class [" +
                    this.advised.getTargetClass() + "]: " +
                    "Common causes of this problem include using a final class or a non-visible class",
                    ex);
        }
        catch (Exception ex) {
            // TargetSource.getTarget() failed
            throw new AopConfigException("Unexpected AOP exception", ex);
        }
    }
执行调用链的地方位于DynamicAdvisedInterceptor的intercept方法,该类实现了MethodInterceptor,会拦截代理对象的方法执行
1
2
3
4
5
6
7
8
9
10
11
12
13
14
15
16
17
18
19
20
21
22
23
24
25
26
27
28
29
30
31
32
33
34
35
36
37
38
39
40
41
42
43
44
45
46
47
48
49

        public Object intercept(Object proxy, Method method, Object[] args, MethodProxy methodProxy) throws Throwable {
            Object oldProxy = null;
            boolean setProxyContext = false;
            Class<?> targetClass = null;
            Object target = null;
            try {
                if (this.advised.exposeProxy) {
                    // Make invocation available if necessary.
                    oldProxy = AopContext.setCurrentProxy(proxy);
                    setProxyContext = true;
                }
                // May be null. Get as late as possible to minimize the time we
                // "own" the target, in case it comes from a pool...
                target = getTarget();
                if (target != null) {
                    targetClass = target.getClass();
                }
                // 获取调用链
                List<Object> chain = this.advised.getInterceptorsAndDynamicInterceptionAdvice(method, targetClass);
                Object retVal;
                // Check whether we only have one InvokerInterceptor: that is,
                // no real advice, but just reflective invocation of the target.
                if (chain.isEmpty() && Modifier.isPublic(method.getModifiers())) {
                    // We can skip creating a MethodInvocation: just invoke the target directly.
                    // Note that the final invoker must be an InvokerInterceptor, so we know
                    // it does nothing but a reflective operation on the target, and no hot
                    // swapping or fancy proxying.
                    Object[] argsToUse = AopProxyUtils.adaptArgumentsIfNecessary(method, args);
                    retVal = methodProxy.invoke(target, argsToUse);
                }
                else {
                    // We need to create a method invocation...
                    // 执行{@link ReflectiveMethodInvocation}
                    retVal = new CglibMethodInvocation(proxy, target, method, args, targetClass, chain, methodProxy).proceed();
                }
                retVal = processReturnType(proxy, target, method, retVal);
                return retVal;
            }
            finally {
                if (target != null) {
                    releaseTarget(target);
                }
                if (setProxyContext) {
                    // Restore old proxy.
                    AopContext.setCurrentProxy(oldProxy);
                }
            }
        }
CglibMethodInvocation#proceed()与ReflectiveMethodInvocation.proceed()一致,此处不再赘述。
总结
到这边,我们完整分析了整个Spring AOP的设计和实现,本质上Spring AOP要解决的问题是模块化和拓展的问题,采取的手段是拦截方法、织入增强。在细粒度AOP概念定义和控制上则借助了AspectJ系列的注解,最终通过JDK或者CGlib技术来实现,并且整个AOP织入生成代理的过程和IoC的Bean生命周期结合起来。在使用Spring框架的过程中,非常多的对象,实际上都是代理对象,我们能够无感知地定义和使用这些代理对象,也得益于这种巧妙的设计。